MotorDriver IIC
产品简介
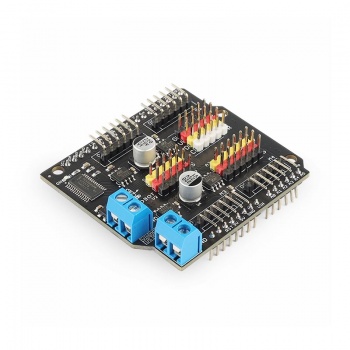
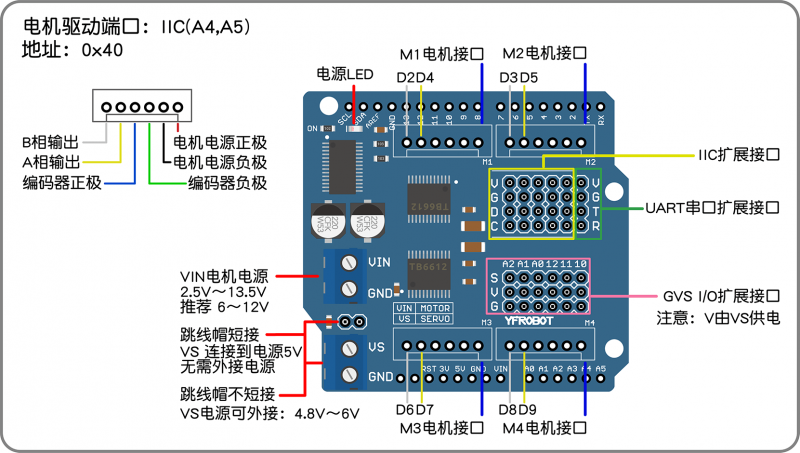
IIC-四路电机驱动模块是采用堆叠式设计,可直接插于Arduino UNO主控板或其兼容板上的电机驱动模块。它集成了PCA9685芯片(一个I2C总线控制的16通道PWM控制器)、2片TB6612电机驱动芯片,只占用Arduino IIC端口(A4-SDA/A5-SCL)即可控制4路电机,IIC地址0x40。
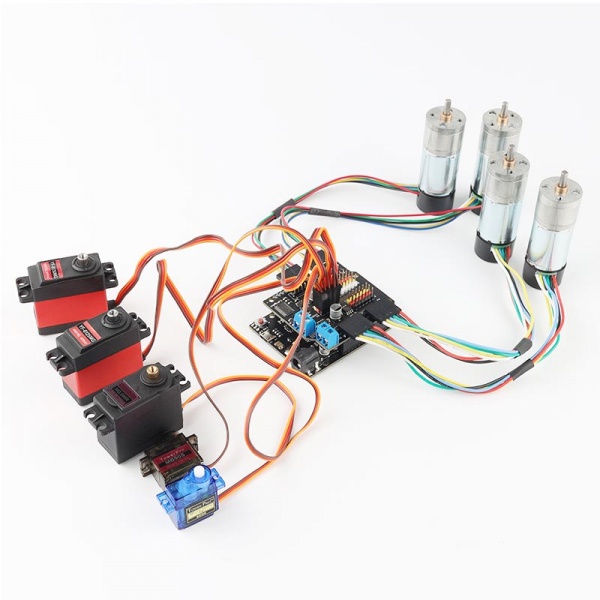
IIC-四路电机驱动模块可直接连接M1、M2、M3、M4,4路电机,接口顺序:电机正极、电机负极、编码器负极、编码器正极、A相、B相;兼容本店多款电机:25、37、N20;且扩展5路IIC接口、1路VGTR串行通信接口、 6路3PGVS标准传感器接口、1路串行通信接口,扩展性强。
规格参数
- 逻辑供电电压:5V DC
- VIN电机供电电压:2.5V~13.5V DC(推荐6V~12VDC)
- VS供电电压:跳线帽短接则为5V,不短接可外接4.8V~6V
- IIC协议控制电机(IIC地址:0x40)
- 5路IIC扩展口(V/G/D-sda/C-scl)
- 1路UART串口通信扩展口(V/G/T-txd/R-rxd)
- 6路GVS I/O扩展口(V由VS供电,通过跳线帽选择如何连接电源)
- 4路电机接口(电机正极/电机负极/编码器负极/编码器正极/A相/B相)
- 电源指示灯x1
功能说明
IIC电机驱动模块与Arduino UNO排母对齐插入,无需外接导线。
供电部分由上部IIC电机驱动板输入,底部主板无需再输入电源。
编码器端口电源部分由底部主板的5V端口输入,信号读取也同样是arduino端口读取,不是arduino适配的型号不建议使用此模块做驱动。
Arduino 扩展库
Arduino library : https://github.com/YFROBOT-TM/Yfrobot-Motor-Driver-Library 库文件下载最新版本,Arduino IDE软件版本要求1.8以上。
Arduino 扩展库使用方法
调用库:
#include <MotorDriver.h> // 包含头文件创建对象:
#define MOTORTYPE YF_IIC_TB ;方法 Methods:
初始化
motorDriver.begin();;
设置电机反向,参数:1-默认,-1-反向
const int offsetm1 = 1;
const int offsetm2 = -1;
const int offsetm3 = 1;
const int offsetm4 = -1;// M1/M3 默认方向 M2/M4反向
驱动单个电机,参数:电机序号 M1,M2,M3,M4;电机速度 -4096~4096
motorDriver.setSingleMotor(M1, 4096); // M1电机全速正转
motorDriver.setSingleMotor(M1, 0); // M1电机停止
驱动4路电机,参数:电机速度 -4096~4096
motorDriver.setMotor(0, 4096, 2048, 1024); // 电机M1停止,电机M2 全速正转,电机M3 50%正转,电机M4 25%正转
motorDriver.setMotor(0, 0, 0, 0); // 电机M1/M2/M3/M4停止
motorDriver.setAllMotor(4096); // 电机M1/M2/M3/M4 全速正转
motorDriver.setAllMotor(0); // 电机M1/M2/M3/M4停止
电机刹车/急停
motorDriver.stopMotor(M1); // 电机M1 刹车
motorDriver.stopMotor(MAll); // 电机M1/M2/M3/M4 刹车
示例代码
/***************************************************
  Motor Test - IIC Motor Drive

  motor driver library: https://github.com/YFROBOT-TM/Yfrobot-Motor-Driver-Library
  motor driver iic Introduction: http://www.yfrobot.com.cn/wiki/index.php?title=MotorDriver_IIC
  motor driver iic:https://item.taobao.com/item.htm?id=626324653253

  YFROBOT ZL
  08/13/2020
 ****************************************************/
#include <MotorDriver.h>

#define MOTORTYPE YF_IIC_TB   //
uint8_t SerialDebug = 1; // 串口打印调试 0-否 1-是

// these constants are used to allow you to make your motor configuration
// line up with function names like forward.  Value can be 1 or -1
const int offsetm1 = 1;
const int offsetm2 = -1;
const int offsetm3 = 1;
const int offsetm4 = -1;

// Initializing motors.
MotorDriver motorDriver = MotorDriver(MOTORTYPE);

void setup() {
  Serial.begin(9600);
  Serial.println("Motor Drive test!");
  motorDriver.begin();
  motorDriver.motorConfig(offsetm1, offsetm2, offsetm3, offsetm4);
  delay(1000);   // wait 2s
  Serial.println("Start...");
}

void loop() {
  motorDriver.setSingleMotor(M1, 4096);  // 电机M1全速正转
  delay(500);
  motorDriver.setSingleMotor(M1, 0);  // 电机M1停止
  delay(500);
  motorDriver.setSingleMotor(M2, -2048);  // 电机M2 50%速度反转
  delay(500);
  motorDriver.setSingleMotor(M2, 0);  // 电机M2停止
  delay(500);
  motorDriver.setSingleMotor(M3, 4096);  // 电机M3全速正转
  delay(500);
  motorDriver.setSingleMotor(M3, 0);  // 电机M3停止
  delay(500);
  motorDriver.setSingleMotor(M4, -2048);  // 电机M4 50%速度反转
  delay(500);
  motorDriver.setSingleMotor(M4, 0);  // 电机M4停止
  delay(1000);

  motorDriver.setMotor(0, 4096, 2048, 1024); // 电机M1停止,电机M2 全速正转,电机M3 50%正转,电机M4 25%正转
  delay(500);
  motorDriver.setMotor(0, 0, 0, 0);  // 电机M1/M2/M3/M4停止
  delay(500);
  motorDriver.setMotor(0, -1024, -2048, -4096);  // 电机M1停止,电机M2 25%反转,电机M3 50%反转,电机M4 全速反转,
  delay(500);
  motorDriver.setMotor(0, 0, 0, 0);  // 电机M1/M2/M3/M4停止
  delay(1000);

  motorDriver.setAllMotor(4096);   // 电机M1/M2/M3/M4 全速正转
  delay(500);
  motorDriver.setAllMotor(0);  // 电机M1/M2/M3/M4 停止
  delay(500);
  motorDriver.setAllMotor(-4096);  // 电机M1/M2/M3/M4 全速反转
  delay(500);
  motorDriver.setAllMotor(0);  // 电机M1/M2/M3/M4 停止
  delay(1000);

  motorDriver.setMotor(4096, 4096, 4096, 4096);       // 电机M1/M2/M3/M4 全速正转
  delay(500);
  motorDriver.stopMotor(M1);    // 电机M1 刹车
  delay(500);
  motorDriver.setMotor(-4096, -4096, -4096, -4096);   // 电机M1/M2/M3/M4 全速反转
  delay(500);
  motorDriver.stopMotor(MAll);  // 电机M1/M2/M3/M4 刹车
  delay(1500);
}
扩展接线
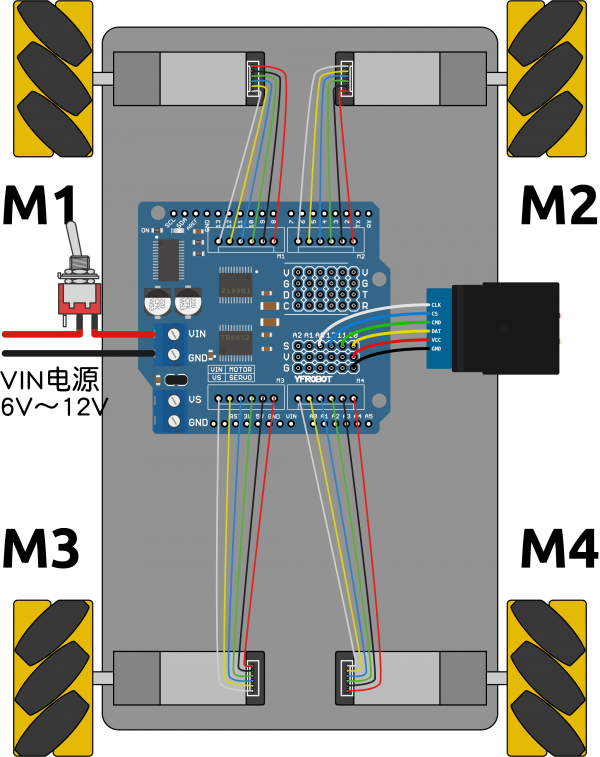
使用Arduino UNO与IIC电机驱动模块驱动麦轮接线示例。
注意:电机驱动仅适合arduino部分型号使用,购买前请联系客服询问具体的型号,不支持其它类型的板子,如:STM32,51,树莓派,ESP32,掌控板,microBit等。模块可以使用的驱动电流持续1.2A,峰值3.2A,这要求不能使用超电流使用,建议使用TT马达,N20电机,GA25电机(注意型号和参数),GB37电机低功率,GB520低功率。
参考资料
官方购买:IIC电机驱动模块
更多建议和问题欢迎反馈至 YFRobot论坛
购买方式: 企业店铺


