“Ethernet库”的版本间的差异
| 第47行: | 第47行: | ||
'''The Ethernet class initializes the ethernet library and network settings. ''' | '''The Ethernet class initializes the ethernet library and network settings. ''' | ||
| − | :-[[Ethernet | + | :-[[Ethernet.begin()| begin()]] |
| − | :-[[Ethernet | + | :-[[Ethernet.localIP()| localIP()]] |
| − | :-[[Ethernet | + | :-[[Ethernet.maintain()| maintain()]] |
<br> | <br> | ||
| 第58行: | 第58行: | ||
'''The IPAddress class works with local and remote IP addressing. ''' | '''The IPAddress class works with local and remote IP addressing. ''' | ||
| − | :-[[Ethernet | + | :-[[Ethernet.IPAddress()()| IPAddress()]] |
<br> | <br> | ||
| 第65行: | 第65行: | ||
'''The Server class creates servers which can send data to and receive data from connected clients (programs running on other computers or devices). ''' | '''The Server class creates servers which can send data to and receive data from connected clients (programs running on other computers or devices). ''' | ||
| − | :-[[Server | + | :-[[Server.Server()| Server()]] |
| − | :-[[Server | + | :-[[Server.EthernetServer()| EthernetServer()]] |
| − | :-[[Server | + | :-[[Server.begin()| begin()]] |
| − | :-[[Server | + | :-[[Server.available()| available()]] |
| − | :-[[Server | + | :-[[Server.write()| write()]] |
| − | :-[[Server | + | :-[[Server.print()| print]] |
| − | :-[[Server | + | :-[[Server.println()| println()]] |
<br> | <br> | ||
| 第84行: | 第84行: | ||
'''The client class creates clients that can connect to servers and send and receive data. ''' | '''The client class creates clients that can connect to servers and send and receive data. ''' | ||
| − | :-[[Client | + | :-[[Client.Client()| Client()]] |
| − | :-[[Client | + | :-[[Client.EthernetClient()| EthernetClient()]] |
| − | :-[[Client | + | :-[[Client.if (EthernetClient)| if (EthernetClient)]] |
| − | :-[[Client | + | :-[[Client.connected()| connected()]] |
| − | :-[[Client | + | :-[[Client.connect()| connect()]] |
| − | :-[[Client | + | :-[[Client.write()| write]] |
| − | :-[[Client | + | :-[[Client.print()| print]] |
| − | :-[[Client | + | :-[[Client.println()| println()]] |
| − | :-[[Client | + | :-[[Client.available()| available()]] |
| − | :-[[Client | + | :-[[Client.read()| read()]] |
| − | :-[[Client | + | :-[[Client.flush()| flush()]] |
| − | :-[[Client | + | :-[[Client.stop()| stop()]] |
<br> | <br> | ||
| 第113行: | 第113行: | ||
'''The EthernetUDP class enables UDP message to be sent and received. ''' | '''The EthernetUDP class enables UDP message to be sent and received. ''' | ||
| − | :-[[EthernetUDP | + | :-[[EthernetUDP.begin()| begin()]] |
| − | :-[[EthernetUDP | + | :-[[EthernetUDP.read()| read()]] |
| − | :-[[EthernetUDP | + | :-[[EthernetUDP.write()| write()]] |
| − | :-[[EthernetUDP | + | :-[[EthernetUDP.beginPacket()| beginPacket()]] |
| − | :-[[EthernetUDP | + | :-[[EthernetUDP.endPacket()| endPacket()]] |
| − | :-[[EthernetUDP | + | :-[[EthernetUDP.parsePacket()| parsePacket()]] |
| − | :-[[EthernetUDP | + | :-[[EthernetUDP.available()| available()]] |
| − | :-[[EthernetUDP | + | :-[[EthernetUDP.stop()| stop()]] |
| − | :-[[EthernetUDP | + | :-[[EthernetUDP.remoteIP()| remoteIP()]] |
| − | :-[[EthernetUDP | + | :-[[EthernetUDP.remotePort()| remotePort()]] |
|width="10%" valign="top" align="left"| | |width="10%" valign="top" align="left"| | ||
2015年7月23日 (四) 23:08的最后版本
|
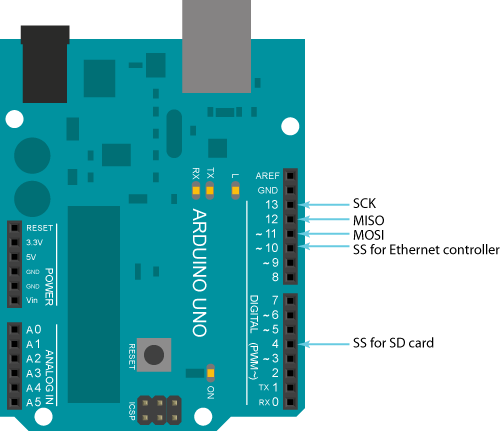
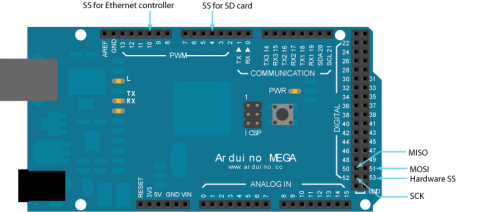
With the Arduino Ethernet Shield, this library allows an Arduino board to connect to the internet. It can serve as either a server accepting incoming connections or a client making outgoing ones. The library supports up to four concurrent connection (incoming or outgoing or a combination). Arduino communicates with the shield using the SPI bus. This is on digital pins 11, 12, and 13 on the Uno and pins 50, 51, and 52 on the Mega. On both boards, pin 10 is used as SS. On the Mega, the hardware SS pin, 53, is not used to select the W5100, but it must be kept as an output or the SPI interface won't work.
Examples
|
Ethernet class The Ethernet class initializes the ethernet library and network settings.
The IPAddress class works with local and remote IP addressing.
The Server class creates servers which can send data to and receive data from connected clients (programs running on other computers or devices).
The client class creates clients that can connect to servers and send and receive data.
The EthernetUDP class enables UDP message to be sent and received.
|
更多建议和问题欢迎反馈至 YFRobot论坛

